This blog post explains how to implement the Custom Sort in Excel using a step-by-step approach with a simple example.
This feature is helpful when you want to showcase your results in some specific order and not by the default ascending or descending fashion.
For example, if there is a requirement from the business user to display the report or results sorted by specific departments/sites/business units at the top and in such cases sorting by ascending or descending won’t be helpful to get the desired output. The Custom sorting feature in Excel comes into the picture in such scenarios.
We can create more than one custom sort list in Excel and we can apply the custom sorting rules to regular Excel tables, Pivot tables, and Pivot Charts. Once we create a custom sort list, we can re-use the custom-sorted list any number of times.
Let’s consider the below example (please note that the below sample has made-up data and does not reflect real-world numbers).

Figure – 0: Excel Table with Sample Data
The user needs a simple Excel report based on this data with Departments listed in the below order:
- Engineering
- R & D
- Finance
- IT
- Marketing
- HR
- Utilities
- Logistics
We can see that the sorting requirements do not follow either ascending or descending order. Hence, we need to go for custom lists.
Steps for implementing a Custom Sort in Excel:
- Open File Menu.

Figure – 1: Open File Menu
2. Under File Menu, click on “Options” menu.
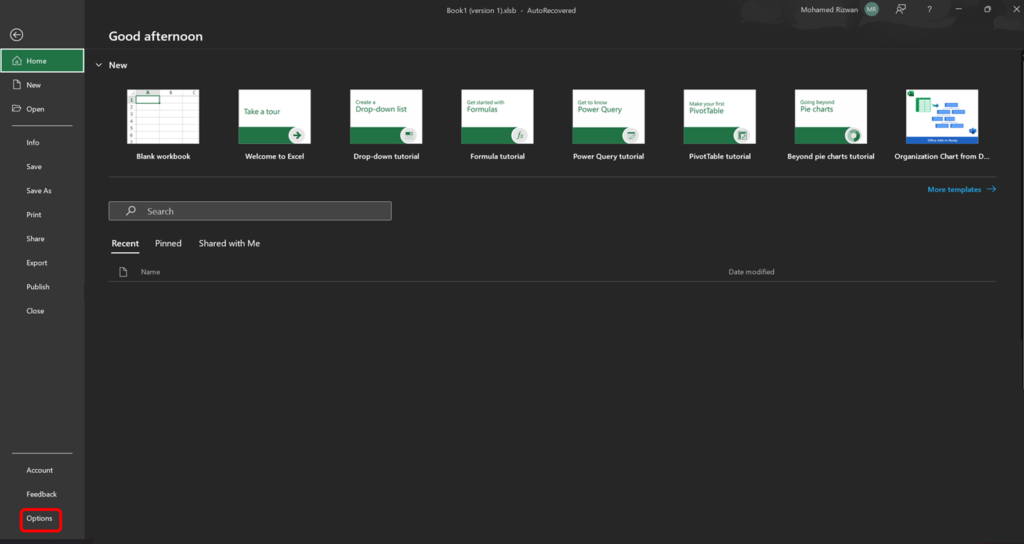
Figure – 2: Click the “Options” menu
3. On the Options window, click the “Advanced” option. Scroll down to the bottom and click the “Edit Custom Lists” button.
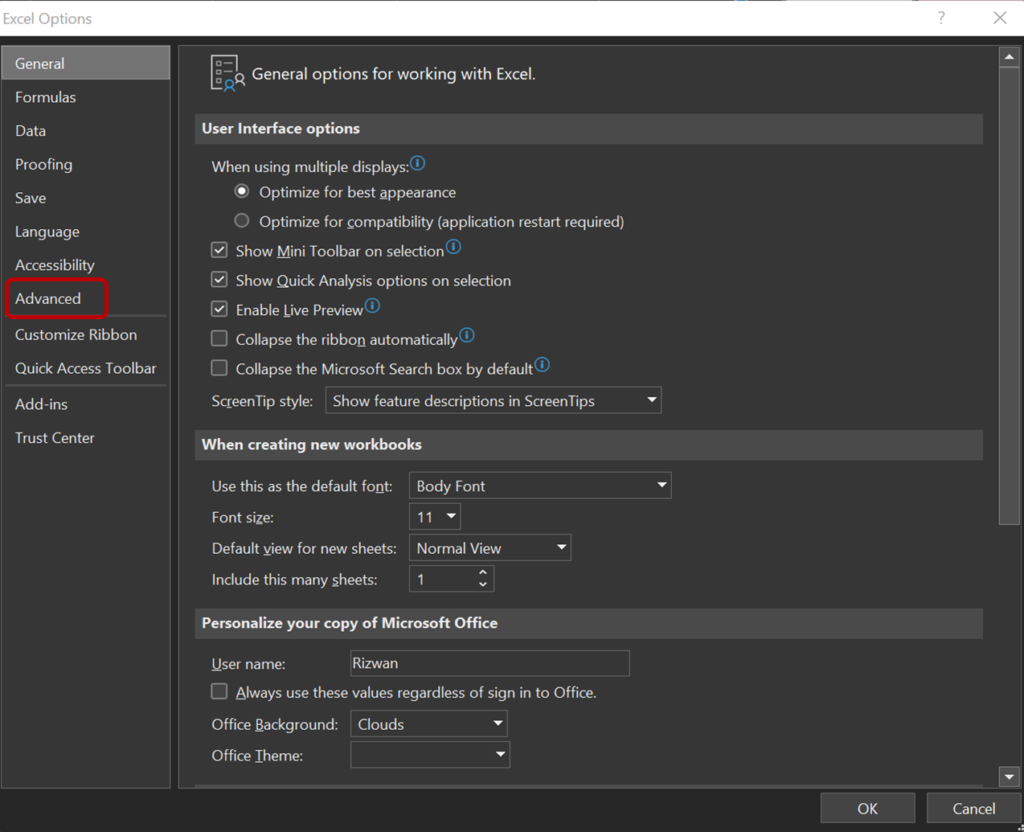
Figure – 3a: Click the Advanced option
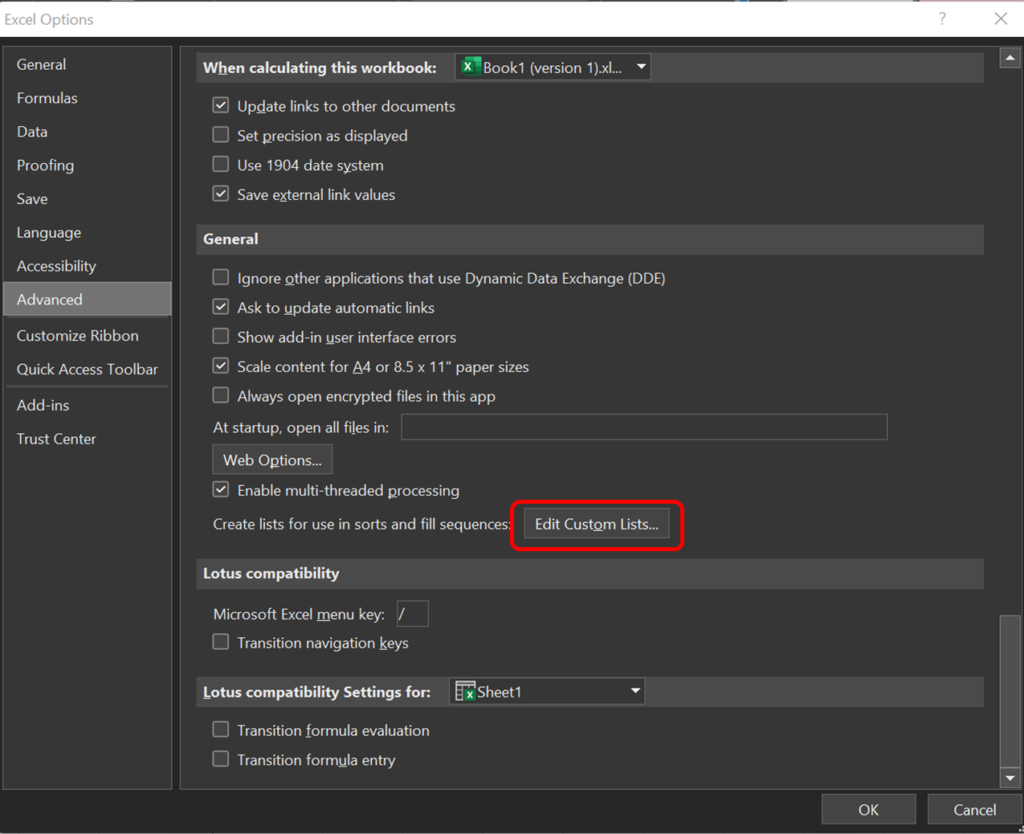
Figure – 3b: Click the Edit Custom Lists Button
4. In the Custom Lists window, click the “NEW LIST” option on the Custom lists section. On the List entries section, enter the required list order with each item separated by a comma. Next, click the “Add” button. The newly entered list gets added to the Custom lists section. Finally, click the “OK” button to close this window.

Figure – 4a: Click the NEW LIST option

Figure – 4b: Add custom list

Figure – 4c: Click the OK button
5. Select the entire unsorted data table, including the column header.

Figure – 5: Select the un-sorted table along with column header
6. Keep the table selected, go to the “Data” menu on the top and click the “Sort” icon.
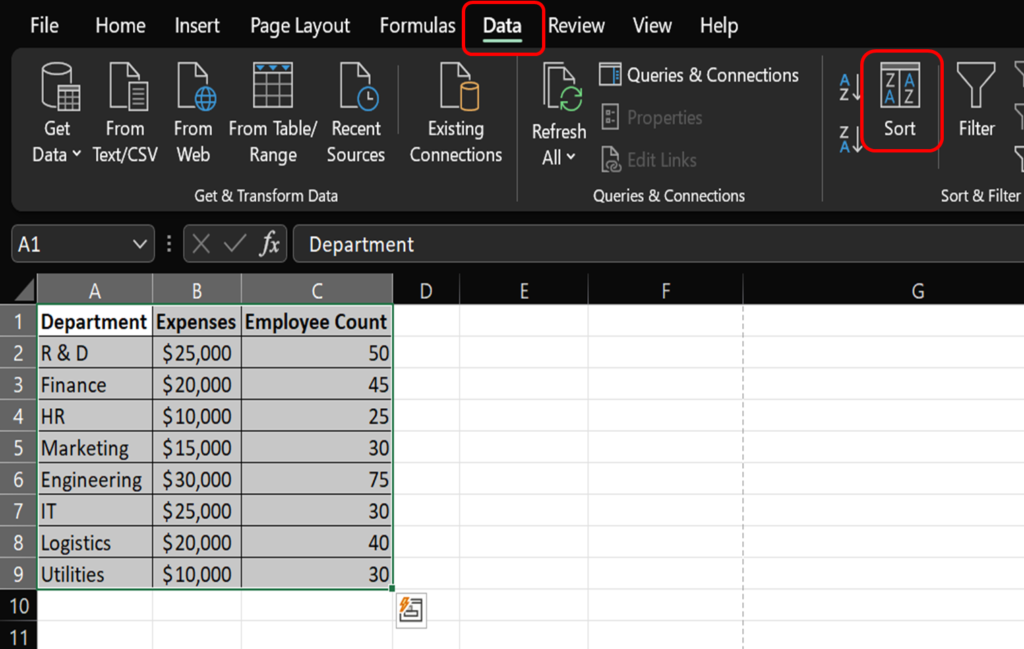
Figure – 6: Click “Sort” icon from “Data” menu
7. In the “Sort” window, select the “Department” column in the Sort By drop-down menu. On the last Order drop-down menu, select “Custom List…”.
On the Custom Lists window that opens next, select the list we created in Step-4 (refer the figure – 7c below) and click the “OK” button.
Finally, choose the “OK” button on the Sort window.
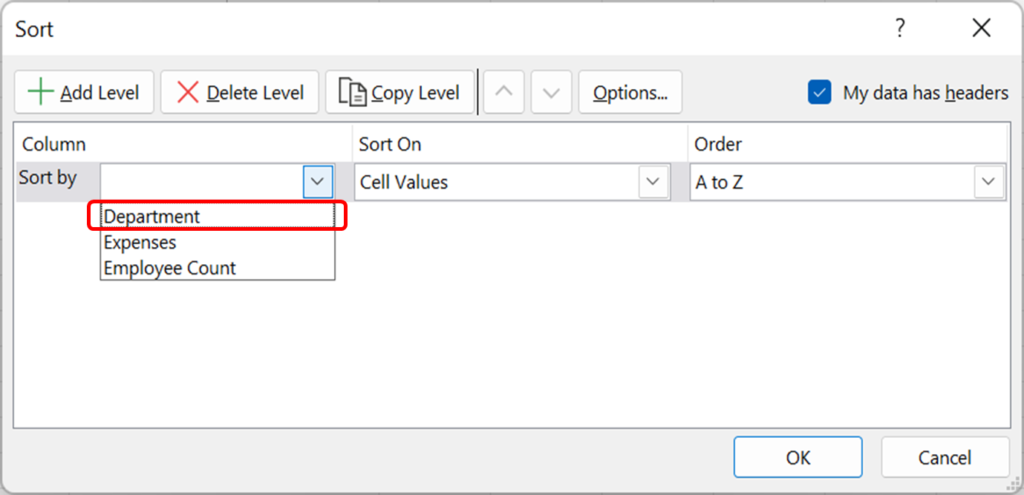
Figure – 7a: Select the Department column on the “Sort By“drop-down menu
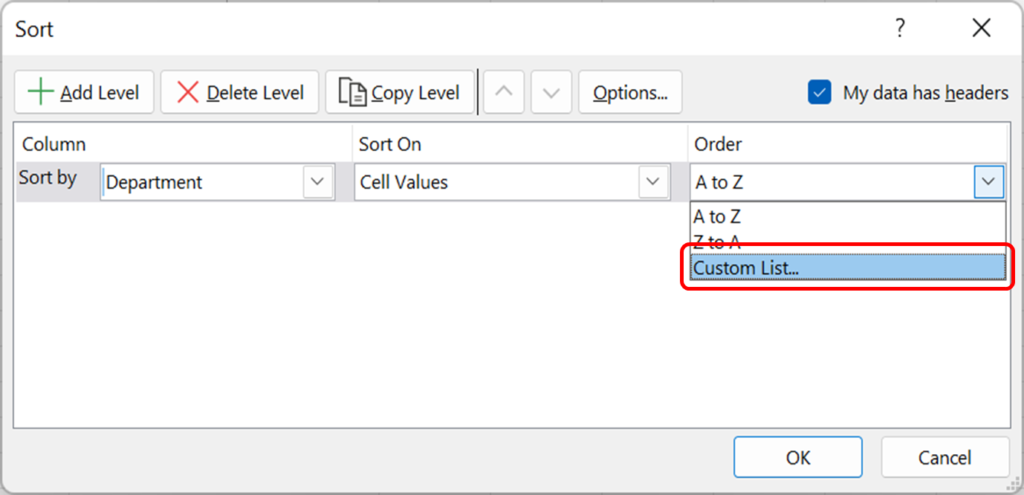
Figure – 7b: Click the Custom List option from the Order drop-down menu
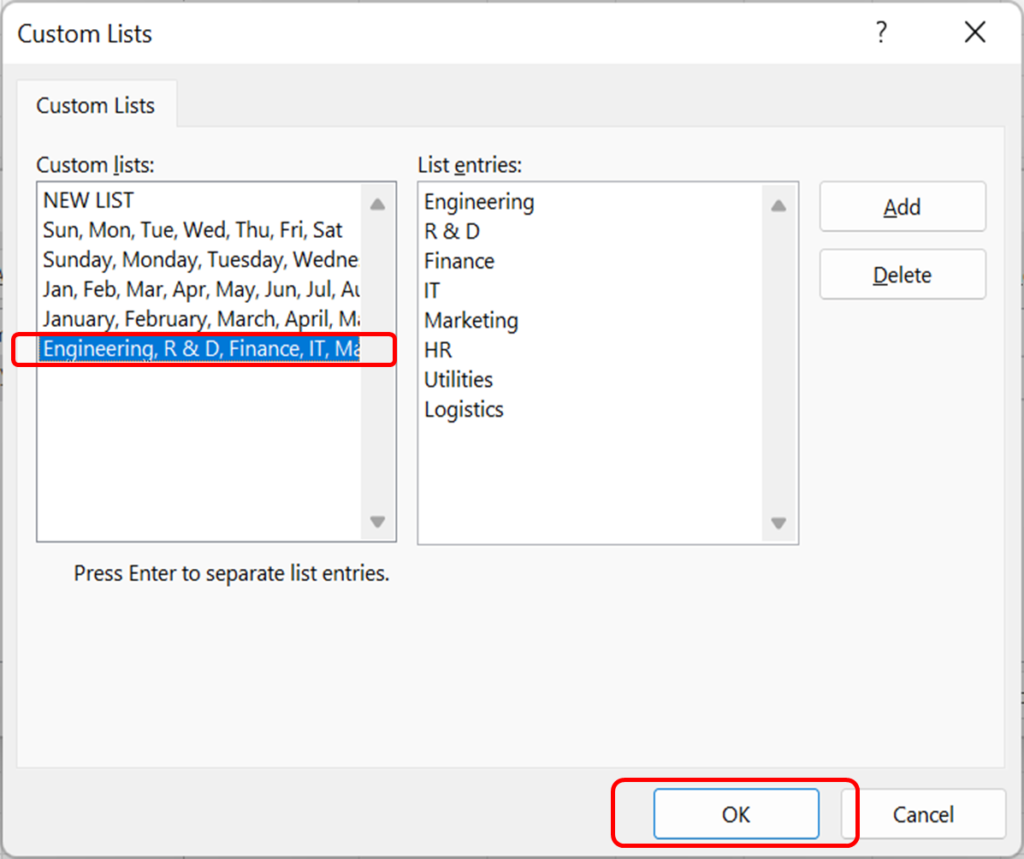
Figure – 7c: Choose the newly added custom list from the collection and click OK
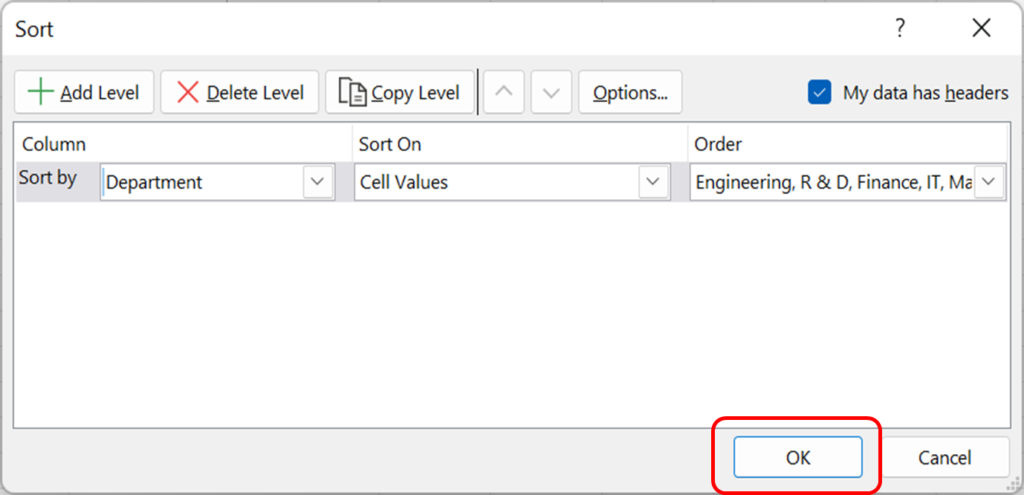
Figure – 7d: On the Sort window, click the “OK” button
8. We can see that our original table is sorted now in the new custom sort order.

Figure – 8: Table sorted in new custom sort order
9. I have created a few visuals like a pivot table and two charts for demo-purpose using the custom sorted table. We can see the new visuals are also sorted automatically in the custom sort order we created.
The custom list gets saved at the Excel application level. In this case, it is a custom sort Department list.
We can use this custom sort list on any number of tables/pivot tables, having the same custom list items, without needing to create the custom list again. We can go directly to the sort window and select the order by custom list and choose the desired custom sort list.
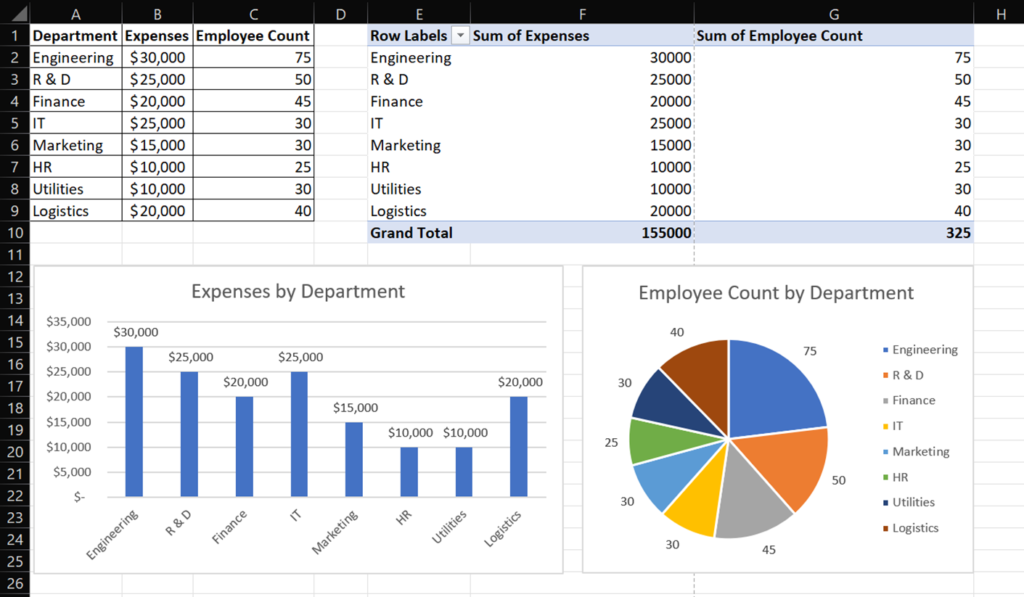
Figure – 9: Table, Pivot table and charts are sorted as per the custom sort order
Summary:
In this blog post, I have explained using an example on the situations we would need a custom list and the steps we needed to follow to implement the Excel custom sort feature. Once we have created a custom sort list of items, we can re-use it multiple times on any table/pivot table as long the table contains the same items as the custom sort item list. It is a one-time configuration for any custom list and the custom list gets stored at the Excel application level for re-usage.
